Integration
Integrate AutoScribe into your platform using our SDKs to automate study creation and management. This is for IT personnel of PACS infrastructure.
Introduction
Section titled “Introduction”Studies can be fully created and managed using the AutoScribe dashboard, but automating and baking AutoScribe into your platform makes the entire process streamlined and more efficient. Additionally, any sort of study viewing requires integrations to provide seamless access to reports within your existing workflow.
This guide covers the essential integration patterns for developers, walking you through the complete setup process from initial configuration to production deployment. For complete API documentation and all available operations, see the API Reference.
Integration Steps
Section titled “Integration Steps”To integrate AutoScribe into your platform, follow these steps:
-
Create API key — Generate an API key in the AutoScribe dashboard with appropriate permissions and scopes for your integration needs.
-
Configure webhooks — Set up webhook endpoints to handle study image access requests (if using the viewer) and report delivery notifications (optional), ensuring secure signature verification.
-
Automate creating studies — Use our SDKs to programmatically create studies from your PACS, RIS, or other systems, enabling seamless workflow integration (manual creation in dashboard also supported).
-
Invite your users — Set up user access and authentication to allow your team members to access AutoScribe reports and studies.
API Configuration
Section titled “API Configuration”Before integrating AutoScribe into your platform, you need to create and configure an API key in the AutoScribe dashboard.
Creating an API Key
Section titled “Creating an API Key”-
After logging in, navigate to the sidebar and go to the API Config section
-
Click the Create API Key button
-
Configure the following values:
- Description: A human-readable description to identify the key in the dashboard
- Study scope: Choose between Self or All
- Self: For teleradiology groups with multiple integrating PACS sources. This ensures each PACS can only access, edit, and manage their own studies
- All: For customers with a unified source of studies or integrators themselves (PACS companies looking to integrate AutoScribe into their platform)
- User access: Choose None, Read, or Write to determine if the API token can invite and manage users
- Express customer access: Explicitly for integrators (PACS companies) looking to serve AutoScribe as a product to all of their customers. Otherwise, leave as None since it won’t be needed
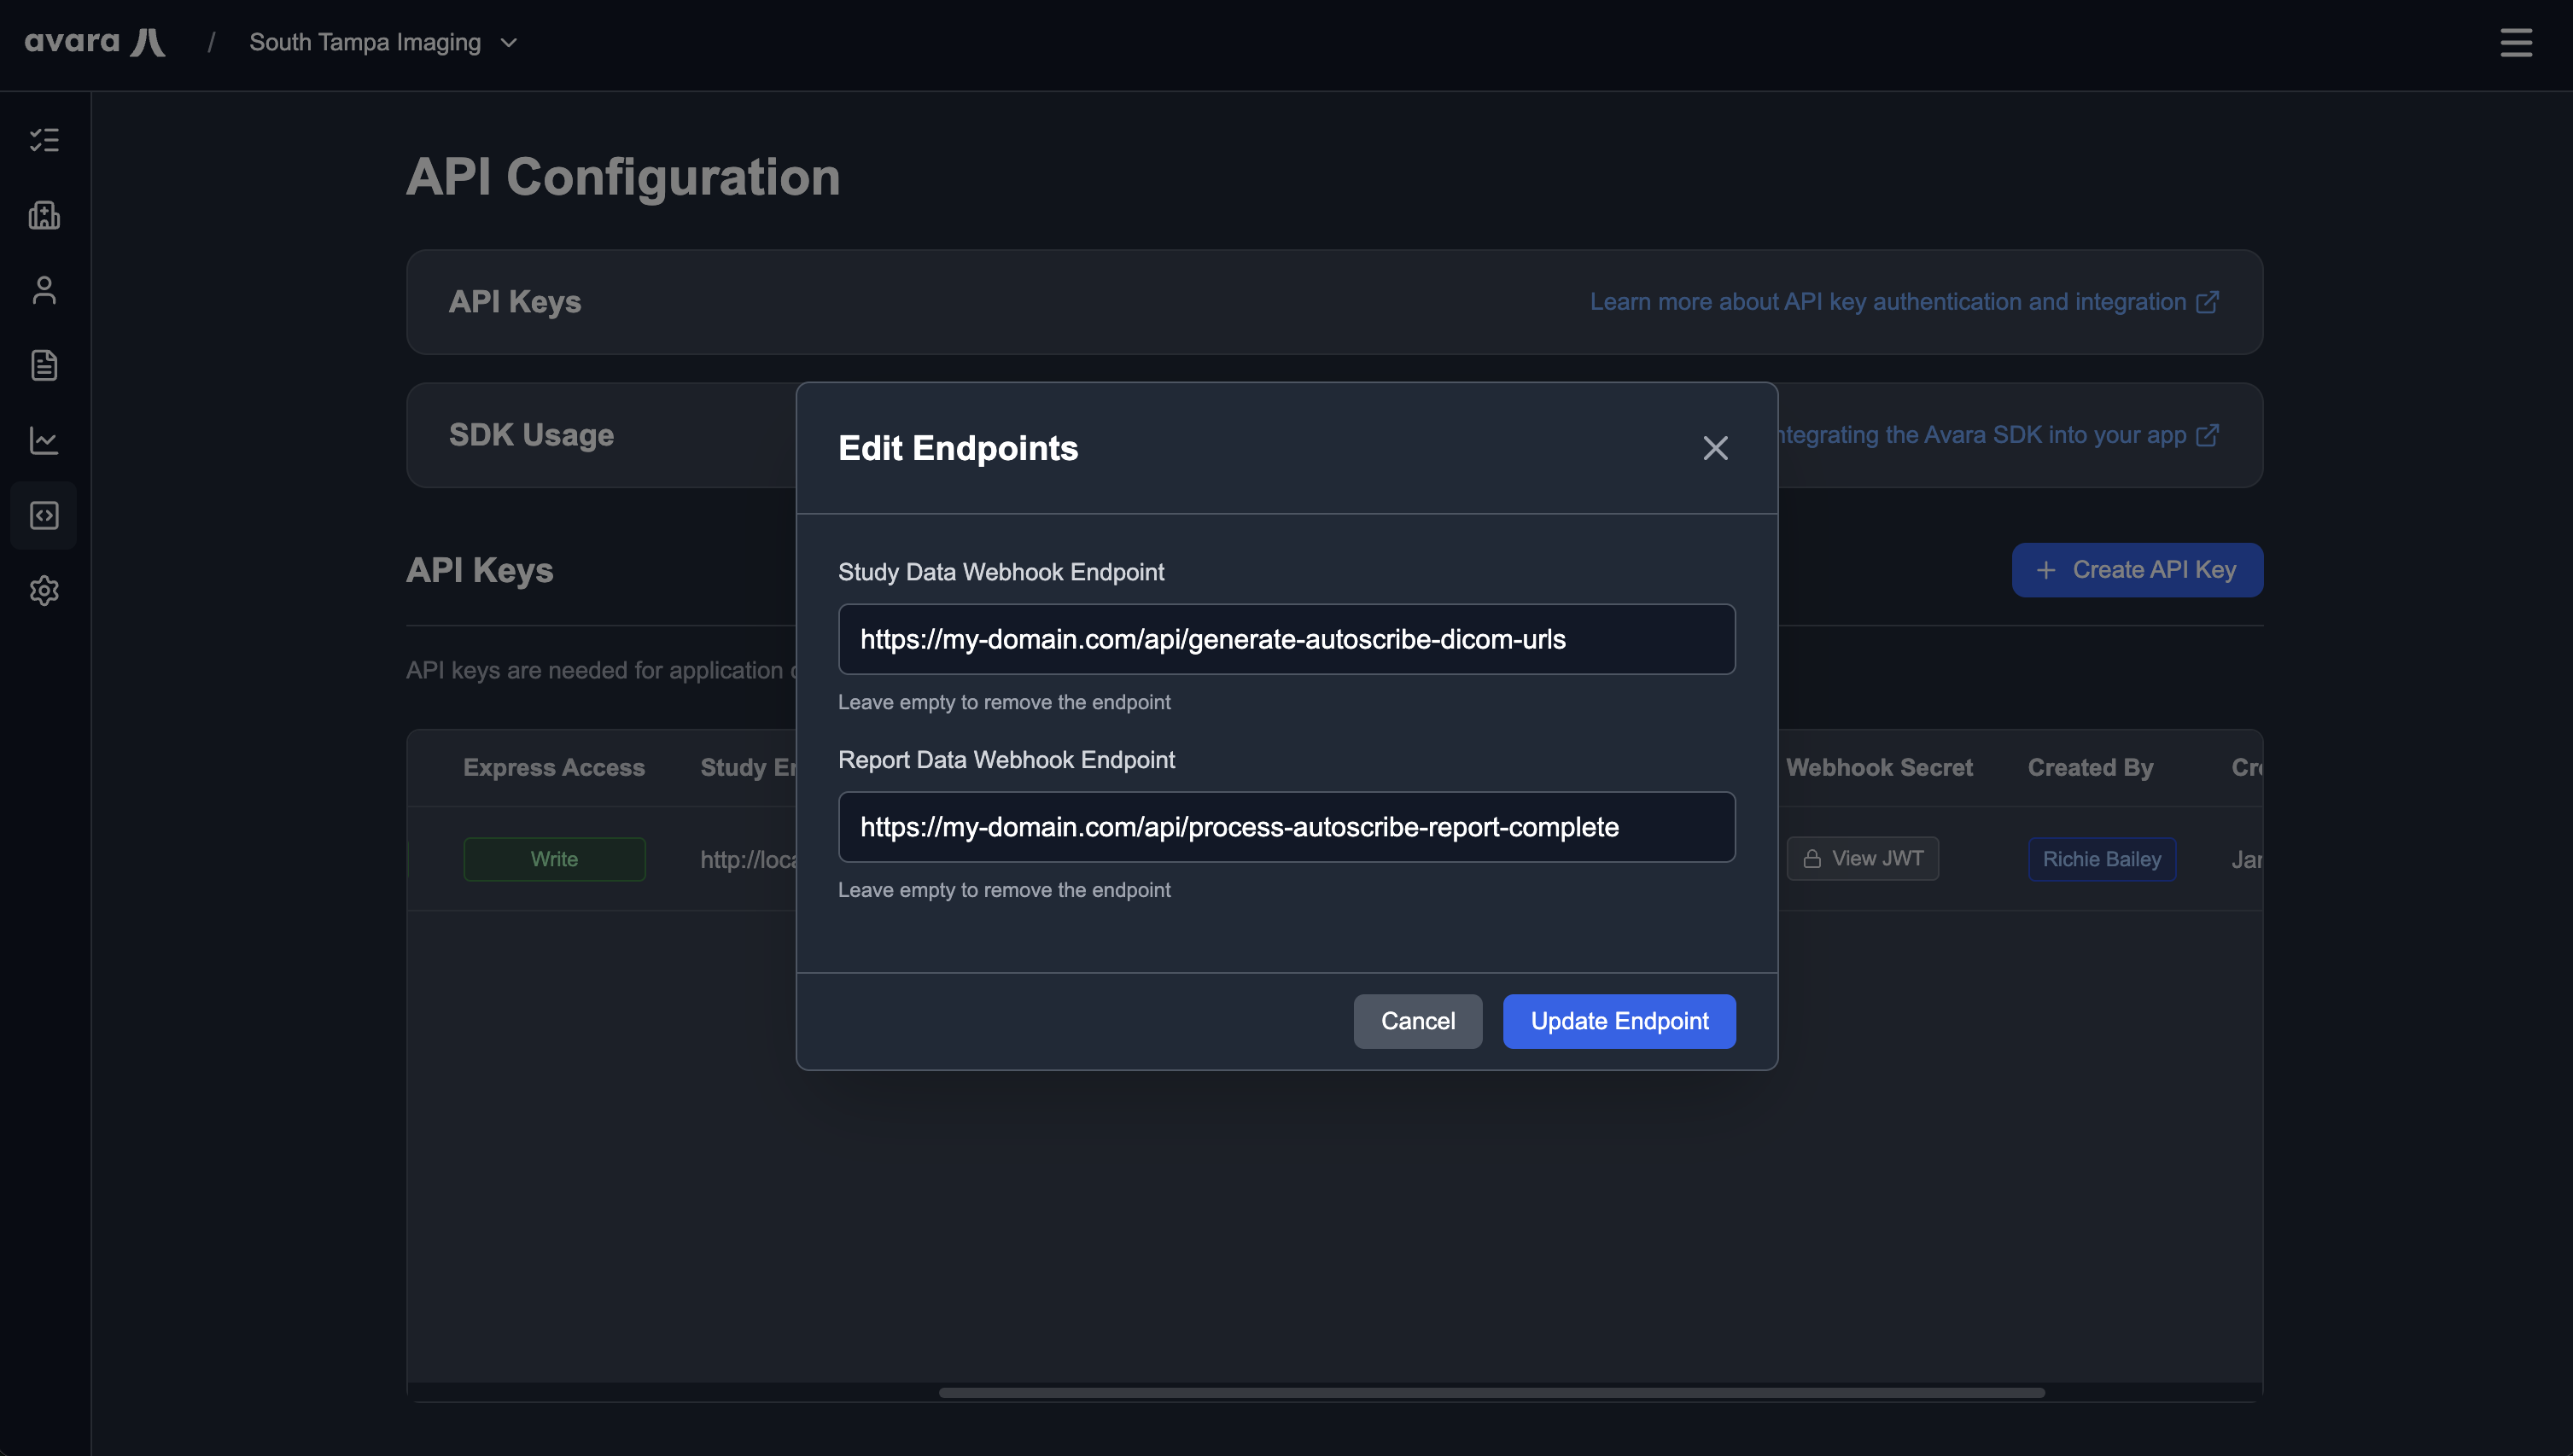
- Study data webhook endpoint: Your domain endpoint to generate study URLs for the viewer (leave blank if you are not going to use the viewer — can be edited later). Example:
https://my-domain.com/api/generate-autoscribe-study-urls(see the Study Image Access webhook section below) - Report data webhook endpoint: Your domain endpoint for processing completed reports (if you do not intend on automating report delivery to your system, then leave blank — can be edited whenever). Example:
https://my-domain.com/api/process-autoscribe-complete-report(see the Report Delivery webhook section below)
-
Once the API key is created, save it to your environment variables — you will not be able to view it again
Editing Webhook Endpoints
Section titled “Editing Webhook Endpoints”To edit webhook endpoints after creating an API key, click the Edit Endpoints button in the API config row for your key.
Viewing Webhook Secret
Section titled “Viewing Webhook Secret”To view the webhook secret for webhook integrations (it is auto-generated), click the View Webhook Secret button in the API config row for your key. This secret can be viewed at any time.
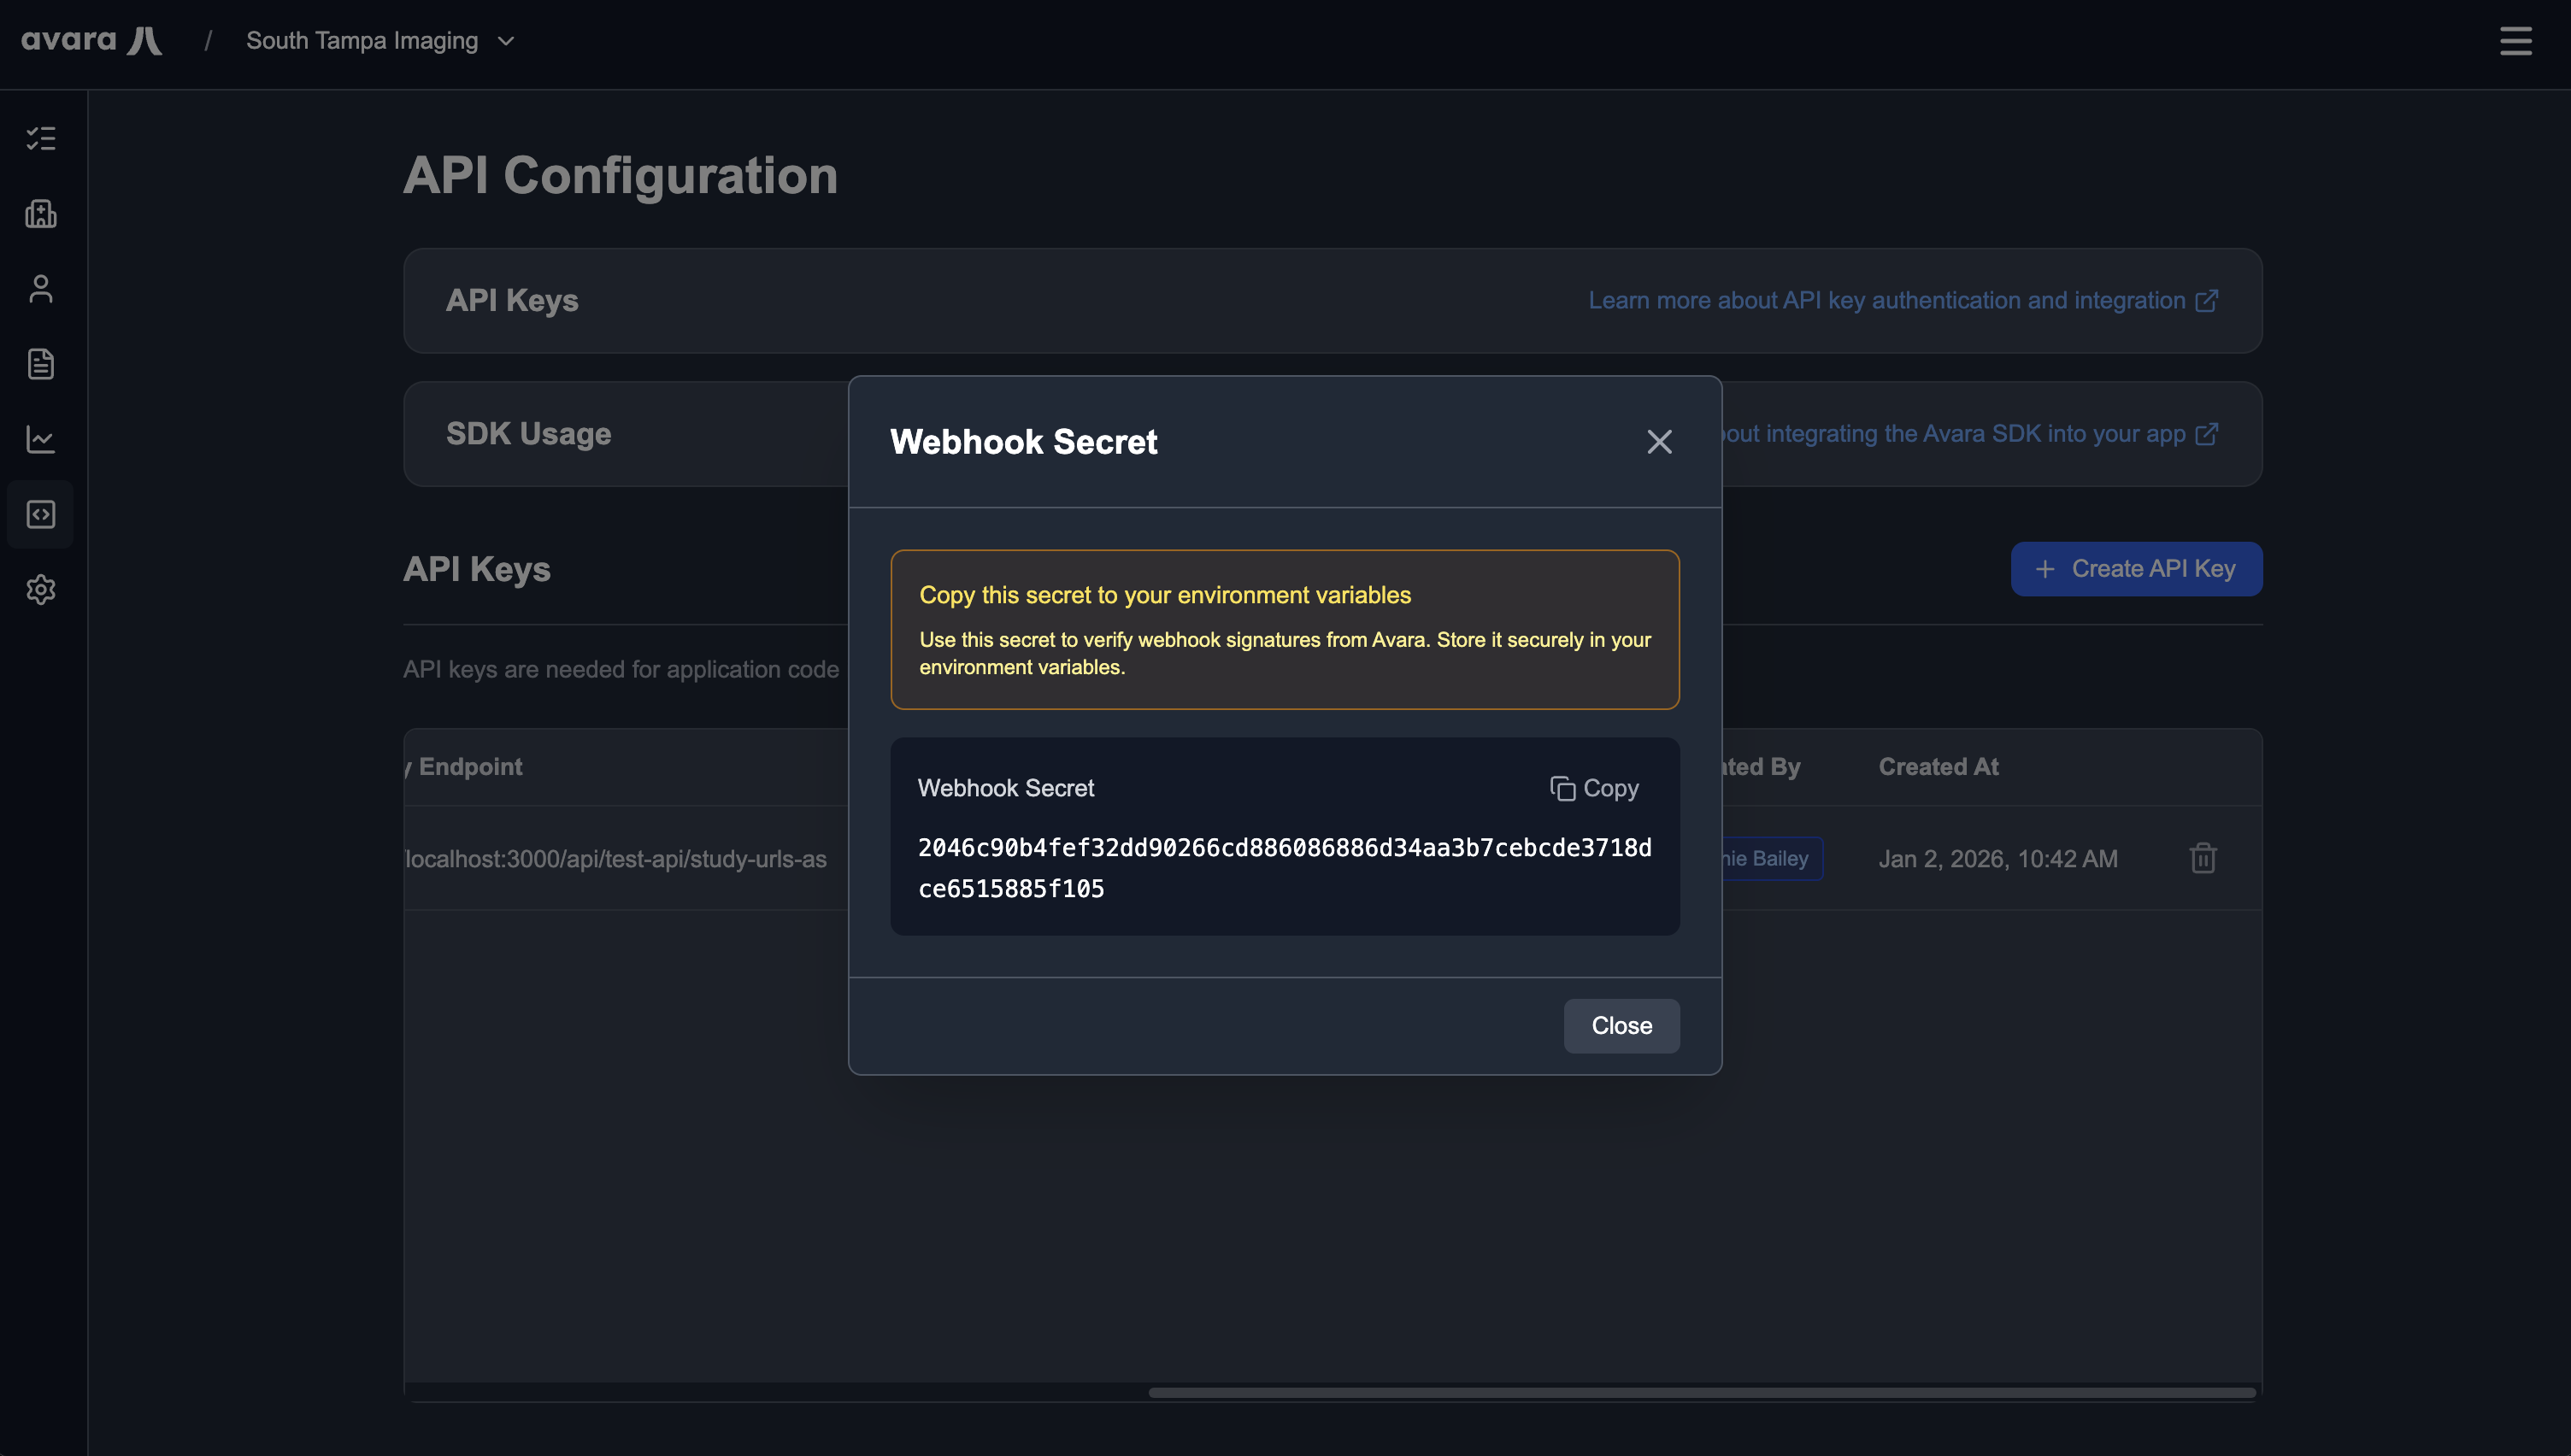
Save this secret to your environment variables as AVARA_WEBHOOK_KEY for use in webhook signature verification.
Creating Studies
Section titled “Creating Studies”The simplest integration pattern is creating studies programmatically using our SDKs. This allows you to automate study creation from your PACS, RIS, or other systems. Studies can also be fully created and managed in the dashboard if desired.
TypeScript
Section titled “TypeScript”import Avara from 'avara';
const avara = new Avara({ apiKey: process.env.AVARA_API_KEY});
const study = await avara.autoScribe.studies.create({ studyUid: '1.3.6.1.4.1.543245.54356543', studyDescription: 'Coronary CT Angiogram', severity: 'normal', reportMetadata: { patientName: 'John Doe', dateOfBirth: '1985-01-01', facilityName: 'South Tampa Imaging', ... },});Python
Section titled “Python”import osfrom avara import Avara
client = Avara( api_key=os.environ.get("AVARA_API_KEY"),)study = client.auto_scribe.studies.create( severity="normal", study_description="Brain MRI with Contrast", study_instance_uid="1.2.840.113619.2.55.3.604688119.868.1234567890.123", report_metadata={ "patient_name": "John Doe", "date_of_birth": "1985-01-01", "facility_name": "South Tampa Imaging", ... },)package com.avara.example;
import com.avara.client.AvaraClient;import com.avara.client.okhttp.AvaraOkHttpClient;import com.avara.models.autoscribe.StudyReportMetadata;import com.avara.models.autoscribe.studies.StudyCreateParams;import com.avara.models.autoscribe.studies.StudyCreateResponse;
public final class Main { private Main() {}
public static void main(String[] args) { AvaraClient client = AvaraOkHttpClient.fromEnv();
StudyCreateParams params = StudyCreateParams.builder() .severity(StudyCreateParams.Severity.NORMAL) .studyDescription("Brain MRI with Contrast") .studyInstanceUid("1.2.840.113619.2.55.3.604688119.868.1234567890.123") .reportMetadata(StudyReportMetadata.builder() .patientName("John Doe") .dateOfBirth("1985-01-01") .facilityName("South Tampa Imaging") .build()) .build(); StudyCreateResponse study = client.autoScribe().studies().create(params); }}Temporary Access Views
Section titled “Temporary Access Views”Temporary access views enable you to generate reroute URLs that provide secure, authenticated access to AutoScribe without requiring users to log in to the Avara AutoScribe dashboard. This feature is designed for advanced PACS company users desiring a fully embedded experience in their platform and is completely optional.
How It Works
Section titled “How It Works”The flow for temporary access views is straightforward:
- Authenticated users request access: Users authenticated in your platform request access to dictate a report
- Server authorization: Your servers authorize the request and generate a reroute URL using our SDK. A user ID is required in order to provide auditing of who is working on the report, since only NPI validated physicians can interpret reports
- Client-side redirect: Serve the URL to the user and redirect them client-side to a new window where they get a secure connection to dictate a report without needing to log in to the Avara AutoScribe dashboard
TypeScript
Section titled “TypeScript”import Avara from 'avara';
const client = new Avara({ apiKey: process.env['AVARA_API_KEY'],});
const response = await client.autoScribe.studies.rerouteURL({ assignedToUserId: 'usr_1234567890abcdef1234567890abcdef', studyId: 'stu_1234567890abcdef1234567890abcdef',});Python
Section titled “Python”import osfrom avara import Avara
client = Avara( api_key=os.environ.get("AVARA_API_KEY"),)response = client.auto_scribe.studies.reroute_url( assigned_to_user_id="usr_1234567890abcdef1234567890abcdef", study_id="stu_1234567890abcdef1234567890abcdef",)package com.avara.example;
import com.avara.client.AvaraClient;import com.avara.client.okhttp.AvaraOkHttpClient;import com.avara.models.autoscribe.studies.StudyRerouteUrlParams;import com.avara.models.autoscribe.studies.StudyRerouteUrlResponse;
public final class Main { private Main() {}
public static void main(String[] args) { AvaraClient client = AvaraOkHttpClient.fromEnv();
StudyRerouteUrlParams params = StudyRerouteUrlParams.builder() .assignedToUserId("usr_1234567890abcdef1234567890abcdef") .studyId("stu_1234567890abcdef1234567890abcdef") .build(); StudyRerouteUrlResponse response = client.autoScribe().studies().rerouteUrl(params); }}Webhooks
Section titled “Webhooks”AutoScribe uses webhooks to integrate with your systems for study image access and report delivery. The Avara SDK handles webhook signature verification and event parsing automatically using the unwrap() method.
Webhook Security
Section titled “Webhook Security”All webhook requests from Avara are signed using HMAC-SHA256. The SDK’s unwrap() method automatically verifies signatures and returns typed webhook events. The SDK reads your AVARA_WEBHOOK_KEY environment variable for signature verification.
TypeScript
Section titled “TypeScript”import Avara from "avara";import express, { Request, Response } from "express";
const client = new Avara(); // reads AVARA_WEBHOOK_KEY from envconst app = express();app.use(express.json());
app.post("/webhooks/avara", async (req: Request, res: Response) => { const event = client.webhooks.unwrap(req.body, req.headers);
if (event.type === "study.access_requested") { // Handle study access request const { studyId, studyInstanceUid } = event.data; // ... }
if (event.type === "report.delivered") { // Handle report delivery const { reportId, studyId, presignedUrl } = event.data; // ... }});Python
Section titled “Python”from avara import Avarafrom flask import Flask, request, jsonify
client = Avara() # reads AVARA_WEBHOOK_KEY from envapp = Flask(__name__)
@app.route('/webhooks/avara', methods=['POST'])def handle_webhook(): event = client.webhooks.unwrap(request.data, request.headers)
if event.type == 'study.access_requested': # Handle study access request study_id = event.data.study_id # ...
if event.type == 'report.delivered': # Handle report delivery report_id = event.data.report_id # ...import com.avara.client.AvaraClient;import com.avara.client.okhttp.AvaraOkHttpClient;import com.avara.models.webhooks.*;import org.springframework.web.bind.annotation.*;import org.springframework.http.ResponseEntity;import javax.servlet.http.HttpServletRequest;import java.util.*;
@RestController@RequestMapping("/webhooks")public class WebhookController {
private final AvaraClient client = AvaraOkHttpClient.fromEnv();
@PostMapping("/avara") public ResponseEntity<?> handleWebhook( @RequestBody String body, HttpServletRequest request ) { WebhookEvent event = client.webhooks().unwrap(body, getHeaders(request));
if (event instanceof StudyAccessRequestedWebhookEvent e) { // Handle study access request String studyId = e.getData().getStudyId(); // ... }
if (event instanceof ReportDeliveredWebhookEvent e) { // Handle report delivery String reportId = e.getData().getReportId(); // ... }
return ResponseEntity.ok().build(); }
private Map<String, List<String>> getHeaders(HttpServletRequest request) { Map<String, List<String>> headers = new HashMap<>(); var headerNames = request.getHeaderNames(); while (headerNames.hasMoreElements()) { String name = headerNames.nextElement(); headers.put(name, Collections.list(request.getHeaders(name))); } return headers; }}Study Image Access
Section titled “Study Image Access”The study.access_requested webhook is sent when Avara needs presigned URLs for DICOM images. This is a synchronous webhook — you must respond with the URLs within the request timeout. This webhook is sent before a study can be viewed in the Avara interface.
When Avara needs to access study images, it sends a POST request to your webhook endpoint. Your endpoint must respond with presigned URLs for the DICOM images. The SDK’s unwrap() method returns a typed StudyAccessRequestedWebhookEvent that you can use directly.
TypeScript
Section titled “TypeScript”import Avara from "avara";import express, { Request, Response } from "express";
const client = new Avara();const app = express();app.use(express.json());
app.post("/webhooks/avara", async (req: Request, res: Response) => { const event = client.webhooks.unwrap(req.body, req.headers);
if (event.type === "study.access_requested") { const { studyId, studyInstanceUid } = event.data;
// This is your internal business logic const presignedUrls = await generatePresignedUrlsForStudy(studyInstanceUid);
if (presignedUrls.length === 0) { return res.status(200).json({ authorized: false, error: "Study not found in PACS", }); }
res.status(200).json({ authorized: true, urls: presignedUrls, }); }});
// This is your internal business logicasync function generatePresignedUrlsForStudy( studyInstanceUid: string): Promise<string[]> { // Query your PACS/RIS system for the study // Generate presigned URLs for each DICOM image // Return a flat list of all image URLs return [ "https://storage.example.com/dicom/image1.dcm?token=abc123", "https://storage.example.com/dicom/image2.dcm?token=def456", ];}Response Format
interface StudyAccessRequestedWebhookResponse { authorized: boolean; urls?: string[]; // Presigned URLs for DICOM images error?: string; // Error message if authorization failed}Python
Section titled “Python”from avara import Avarafrom flask import Flask, request, jsonifyfrom typing import List
client = Avara()app = Flask(__name__)
@app.route('/webhooks/avara', methods=['POST'])def handle_webhook(): event = client.webhooks.unwrap(request.data, request.headers)
if event.type == 'study.access_requested': study_id = event.data.study_id study_instance_uid = event.data.study_instance_uid
# This is your internal business logic presigned_urls = generate_presigned_urls_for_study(study_instance_uid)
if not presigned_urls: return jsonify({ 'authorized': False, 'error': 'Study not found in PACS' }), 200
return jsonify({ 'authorized': True, 'urls': presigned_urls }), 200
# This is your internal business logicdef generate_presigned_urls_for_study(study_instance_uid: str) -> List[str]: # Query your PACS/RIS system for the study # Generate presigned URLs for each DICOM image # Return a flat list of all image URLs return [ 'https://storage.example.com/dicom/image1.dcm?token=abc123', 'https://storage.example.com/dicom/image2.dcm?token=def456', ]Response Format
from typing import TypedDict, Optional, List
class StudyAccessRequestedWebhookResponse(TypedDict, total=False): authorized: bool urls: Optional[List[str]] # Presigned URLs for DICOM images error: Optional[str] # Error message if authorization failedimport com.avara.client.AvaraClient;import com.avara.client.okhttp.AvaraOkHttpClient;import com.avara.models.webhooks.*;import org.springframework.web.bind.annotation.*;import org.springframework.http.ResponseEntity;import javax.servlet.http.HttpServletRequest;import java.util.*;
@RestController@RequestMapping("/webhooks")public class WebhookController {
private final AvaraClient client = AvaraOkHttpClient.fromEnv();
@PostMapping("/avara") public ResponseEntity<?> handleWebhook( @RequestBody String body, HttpServletRequest request ) { WebhookEvent event = client.webhooks().unwrap(body, getHeaders(request));
if (event instanceof StudyAccessRequestedWebhookEvent e) { String studyId = e.getData().getStudyId(); String studyInstanceUid = e.getData().getStudyInstanceUid();
// This is your internal business logic List<String> presignedUrls = generatePresignedUrlsForStudy(studyInstanceUid);
if (presignedUrls.isEmpty()) { return ResponseEntity.ok(Map.of( "authorized", false, "error", "Study not found in PACS" )); }
return ResponseEntity.ok(Map.of( "authorized", true, "urls", presignedUrls )); } return ResponseEntity.ok().build(); }
// This is your internal business logic private List<String> generatePresignedUrlsForStudy(String studyInstanceUid) { // Query your PACS/RIS system for the study // Generate presigned URLs for each DICOM image // Return a flat list of all image URLs return List.of( "https://storage.example.com/dicom/image1.dcm?token=abc123", "https://storage.example.com/dicom/image2.dcm?token=def456" ); }
private Map<String, List<String>> getHeaders(HttpServletRequest request) { Map<String, List<String>> headers = new HashMap<>(); var headerNames = request.getHeaderNames(); while (headerNames.hasMoreElements()) { String name = headerNames.nextElement(); headers.put(name, Collections.list(request.getHeaders(name))); } return headers; }}Response Format
public class StudyAccessRequestedWebhookResponse { private boolean authorized; private List<String> urls; // Presigned URLs for DICOM images private String error; // Error message if authorization failed}Report Delivery
Section titled “Report Delivery”The report.delivered webhook is sent when a report is completed and delivered. This is an asynchronous notification — respond with a simple success acknowledgment. The webhook includes both plain text content and a presigned URL for PDF download.
When a report is completed, Avara sends a POST request to your webhook endpoint. Your endpoint should process the report and respond with a success acknowledgment. The SDK’s unwrap() method returns a typed ReportDeliveredWebhookEvent that you can use directly.
TypeScript
Section titled “TypeScript”import Avara from "avara";import express, { Request, Response } from "express";
const client = new Avara();const app = express();app.use(express.json());
app.post("/webhooks/avara", async (req: Request, res: Response) => { const event = client.webhooks.unwrap(req.body, req.headers);
if (event.type === "report.delivered") { const { reportId, studyId, plainText, presignedUrl } = event.data;
// This is your internal business logic await processCompletedReport({ reportId, studyId, plainText, presignedUrl, });
res.status(200).json({ success: true, }); }});
// This is your internal business logicasync function processCompletedReport(data: { reportId: string; studyId: string; plainText?: string; presignedUrl: string;}): Promise<void> { // Download the PDF from the presigned URL // Store the report in your system // Update your PACS/RIS with the completed report // Notify relevant users or systems}Response Format
interface ReportDeliveredWebhookResponse { success: boolean;}Python
Section titled “Python”from avara import Avarafrom flask import Flask, request, jsonify
client = Avara()app = Flask(__name__)
@app.route('/webhooks/avara', methods=['POST'])def handle_webhook(): event = client.webhooks.unwrap(request.data, request.headers)
if event.type == 'report.delivered': report_id = event.data.report_id study_id = event.data.study_id plain_text = event.data.plain_text presigned_url = event.data.presigned_url
# This is your internal business logic process_completed_report({ 'report_id': report_id, 'study_id': study_id, 'plain_text': plain_text, 'presigned_url': presigned_url, })
return jsonify({'success': True}), 200
# This is your internal business logicdef process_completed_report(data: dict): # Download the PDF from the presigned URL # Store the report in your system # Update your PACS/RIS with the completed report # Notify relevant users or systems passResponse Format
from typing import TypedDict
class ReportDeliveredWebhookResponse(TypedDict): success: boolimport com.avara.client.AvaraClient;import com.avara.client.okhttp.AvaraOkHttpClient;import com.avara.models.webhooks.*;import org.springframework.web.bind.annotation.*;import org.springframework.http.ResponseEntity;import javax.servlet.http.HttpServletRequest;import java.util.*;
@RestController@RequestMapping("/webhooks")public class WebhookController {
private final AvaraClient client = AvaraOkHttpClient.fromEnv();
@PostMapping("/avara") public ResponseEntity<?> handleWebhook( @RequestBody String body, HttpServletRequest request ) { WebhookEvent event = client.webhooks().unwrap(body, getHeaders(request));
if (event instanceof ReportDeliveredWebhookEvent e) { String reportId = e.getData().getReportId(); String studyId = e.getData().getStudyId(); String plainText = e.getData().getPlainText(); String presignedUrl = e.getData().getPresignedUrl();
// This is your internal business logic processCompletedReport(reportId, studyId, plainText, presignedUrl);
return ResponseEntity.ok(Map.of("success", true)); } return ResponseEntity.ok().build(); }
// This is your internal business logic private void processCompletedReport( String reportId, String studyId, String plainText, String presignedUrl ) { // Download the PDF from the presigned URL // Store the report in your system // Update your PACS/RIS with the completed report // Notify relevant users or systems }
private Map<String, List<String>> getHeaders(HttpServletRequest request) { Map<String, List<String>> headers = new HashMap<>(); var headerNames = request.getHeaderNames(); while (headerNames.hasMoreElements()) { String name = headerNames.nextElement(); headers.put(name, Collections.list(request.getHeaders(name))); } return headers; }}Response Format
public class ReportDeliveredWebhookResponse { private boolean success;}API Reference
Section titled “API Reference”For complete API documentation, including all available operations, webhooks, and advanced features, see the API Reference.